About the Author

typingcom

student recognition

6 Ways to Recognize Students’ Typing Progress

It always feels good to be recognized for your achievements. Not only is recognition enjoyable, but it motivates you to work harder and continue to seek improvement.

In the classroom, the more motivated students are, the better. By building in fun ways to celebrate student successes with typing, your class will be more invested in logging practice time and improving their speed and accuracy.

Below are 6 fun ways to recognize students’ typing progress in your classroom.

Typing.com Achievements

Recognition of progress and excellence comes in many forms. On Typing.com, students can earn achievements as they successfully progress through the lessons. You can have students track the achievements that they’ve earned on a sticker chart to increase investment and let students see where they stack up in comparison with their peers.

WPM Certificates

Print out certificates for students with a certain WPM or higher. The WPM rate you choose to celebrate should depend on how long students have been practicing their typing and how selective you want the award to be. Ideally, you want to set a goal that all students feel confident working towards, knowing that some will take much longer than other to get there.

Keyboarding Wall of Fame

Choose an area of your classroom to be the Keyboarding Wall of Fame. The top 10 highest WPM students get their name and WPM on the hall of fame. Make the challenge extra fun by having the wall carry over from year to year. Students will be motivated to beat last year’s students, friends, and older siblings.

Find the complete activity plan here.

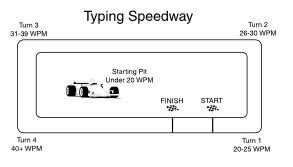
Fast Track Keyboarding Experiment

Visual reminders of progress can be powerful motivators for students. This visual tracker is also fun! Create a rectangular racetrack on your whiteboard and give each student a paper cutout of a car. Everyone starts at the starting line, and can only progress to the next corner of the track when they reach a designated WPM on a timed typing task. Celebrate students as they progress around the track and have a special certificate or trophy for the first student to cross the finish line.

Weekly Growth Shoutouts

When it comes to giving praise, it’s important to recognize those students at the top, but also those who have made great growth. By using the progress monitoring reports on Typing.com you can easily identify students who have shown improvement over a given span in time. Whether it’s improving speed, accuracy, or both, create a time in your weekly schedule to shout out these students in a public way. Depending on the age of the students, this could be a fun chant or just a few genuine words of recognition.

Teacher’s Chair Award

One of the greatest honors in a classroom is to sit in the teacher’s chair during class. This is obviously something that happens very seldom for kids, making the experience especially exciting. If the layout of your classroom and your teaching style allow it, offer the incentive of letting one student sit in the teacher’s chair during typing time at the end of the week. Make sure there is a clear criteria for how a student will be chosen, but change the metric from week to week so that your fastest typist isn’t always the winner.

There are plenty of other ways that student growth and performance can be celebrated. At the end of the day, what matters is that students get recognition for their hard work and achievement so they are motivated to keep at it!

The Science Behind Why Achievements Motivate Students

“You’ve unlocked a new level!”

“Top-speed bonus!”

There’s something addictive about the ability to earn rewards in a video game based on your performance. It doesn’t matter what age group the game is targeted towards, nearly all video games today employ these performance “badges” in their interface. Apart from being fun, these rewards motivate users to keep playing and to try harder.

So just why do badges in games work? Because they tap into our basic principles of human nature.

Humans are programmed to find satisfaction in meeting goals, to feel motivated when our efforts are acknowledged, and even to compete with one another. Badges play to these aspects of our human psychology, leading users to want to work harder, spend more time practicing, and continue to meet our goals.

Typing.com is in the process of making adjustments to the way we teach kids to type. One change that’s on the way? New Achievement Badges!

With this update, we didn’t just want to make the program more fun for kids but wanted to capitalize on research that shows how badges can improve achievement.

Read on to learn more about 8 different science-backed ways that badges can help boost student performance.

Psychological Basis of Badges

1. Badges set our performance expectations higher

The best way to improve motivation? Recognize accomplishments. When students receive a badge improving their WPM or mastering a new letter, they know that their hard work has not gone unnoticed and are more motivated to keep reaching new performance benchmarks.

2. Badges increase our self-confidence

From a psychological standpoint, humans feel much more accomplished if they have set and reached manageable goals. When students consistently see that they can accomplish what they’ve set out to do, their self-esteem will soar.

3. Badges give us satisfaction

Not only will achieving goals help students feel better about themselves, but also about the work they are doing. People find more value and satisfaction in a task when it is linked to an end goal that rewards practice.

4. Badges secure a commitment to meeting goals

People are much more committed to meeting a goal when they have a measurable way to know when they’ve reached it. Getting their typing speed to 90 WPM is much more motivating than merely trying to type faster. By rewarding badges for specific milestones, students are more likely to be committed to working on those skills.

5. Badges provide guidance and feedback

Clearly laid out goals help students understand what different areas of a skill they want to work on. As students can earn a badge for speed, accuracy, and consistent practice, they’ll come to learn that all of these are important aspects of being a successful typist. Additionally, looking at where they are and are not earning badges will provide feedback as to which of these areas they most need to work on.

6. Badges help us get into “the flow”

Psychological flow occurs when someone feels that “click” when the skill they are practicing starts to come naturally. Badges help encourage students to pursue this flow by rewarding them as they progress toward full mastery of a skill.

7. Badges provide us with social proof

Human beings are wired to do what we see others doing. For example, everyone around you started working standing up, you would assume there is some benefit to a standing desk and would want to try it out. When students see their peers having great success with typing by practicing every day or sitting up straight, they’ve more likely to take the social cue and do the same.

8. Badges trigger motivating social comparisons

Call it competition or just a desire to keep up with the crowd, but students are often motivated not only by their own badges but the badges of others as well. When a kid sees a desk mate improve his accuracy to a 90% he will be motivated to meet the same goal or even surpass what his peer accomplished. This is not simply from a desire to compete, but also because they now see it as a possible goal.

So, get ready to sit back and watch how these different psychological phenomena come into play as your students test out the new Typing.com and try to earn as many badges as they can.

Setting Goals with Your Typing Students

Studies show that people who write down clearly defined goals are more likely to succeed than those who don’t.

It’s no surprise then that everyone from professional athletes, to business managers, to politicians tend to set clear and specific goals for themselves.

As a teacher, goal setting can be a powerful practice to boost student achievement and to invest students in what they’re learning.

While short term goals are important, at the beginning of the school year, setting long term goals can ground students in what they are working towards and give them a clear purpose for their daily lessons.

One great place to use long term goals? Typing, of course!

Students are much more likely to focus on their typing lessons when they have a clear picture of what they’re aiming for.

So consider kicking off the school year with some typing goal setting.

Investing Students in Goals

Goals are only valuable if students have a genuine desire to meet them.

Make sure that you introduce the idea of goal setting as its own mini-lesson, giving it as much weight as you would any other academic subject.

Studies show that the act of writing down a goal is valuable in making it motivational. You might consider giving students a tracking sheet where they write down their initial WPM (more on this in a minute), their long term goal, and then keep track of their weekly progress.

It can also be valuable to remind students of other times they’ve set and met their goals. That time their soccer team won the championship? When they moved up a level in karate?

These reminders of how good it feels to accomplish what you’ve set out to do can boost students’ investment in the process.

Finally, don’t forget to mention what will happen once students meet their goals. For the most part, the feeling of success should motivate students in and of itself, but maybe students get their name on the “Typing Masters” wall or get a certificate they can take home to show their parents.

Giving recognition to students as they reach their goals will continue to build a culture of achievement in your classroom.

Typing Performance Metrics

When it comes to setting goals for students, there are two main metrics that are used to measure typing performance.

Words-per-minute (WPM) is the measure of a person’s typing speed, while accuracy denotes the number of mistyped characters.

Typically, it makes more sense to set a blanket goal around accuracy for your whole class. You want to instill the importance of accurate typing over speed when students first get started.

We recommend having students in grades K-3 shoot for 80-85% accuracy, and students in grades 4 and up aim for 90% and above.

WPM goals, on the other hand, will typically vary from student to student depending on their initial typing speed.

While there is no set rule for how fast students of a given age should be typing, the following list gives ballpark WPM rates:

– Kindergarten: 5-7 WPM
– 1st grade: 7-10 WPM
– 2nd grade: 10-12 WPM
– 3rd grade: 13-15 WPM
– 4th grade: 15-18 WPM
– 5th grade: 18-20 WPM

Obviously, these numbers will vary by student and depend on how much prior typing experience each child has.

Helping Students Set Goals

For WPM goals, it’s more powerful if students set their own, instead of having a prescribed goal assigned by a teacher.

That said, kids will definitely need some guidance here. If left to their own devices, students are likely to set unrealistic goals that don’t serve the purpose of being motivational.

A good place to start is to have students take 2-3 timed typing tests at the beginning of the year. Have students average their WPM from these and use this number as their starting point.

Students can record this number on a private goal tracking sheet, or you can publicly display these somewhere in your room.

From there, you can generally expect students to grow between 3-5 words per minute over the course of a school year. This assumes students are practicing 20-30 minutes per week. If students will be spending more time typing, they’re likely to see more growth.

Once students have set a goal for their typing progress within a given timeframe (say by Thanksgiving), have them take periodic typing tests on a monthly (or more frequent if they’re typing more often) basis. Each month they can record their new WPM alongside their goal and track the progress they are making.

Find a fun way to celebrate students as they meet their goals. For example, on our twitter account, some teachers post pictures of students with their certificates once they’ve broken 30wpm.

Once goals are met, encourage students to set a new goal for themselves to help them keep their eye on the prize!

Back-to-School Resources for Typing Teachers

I know firsthand just how quickly back-to-school can sneak up on you.

One day you’re relaxed, with weeks yet to prepare, and then all of a sudden it feels like you’ve been transported to the night before school starts.

Year after year, it was always the same.

In case that’s what you’re feeling right now, I’ve put together some of our best back-to-school resources for you in one convenient post.

Here you should find everything you need to get your typing curriculum up and running in the new school year.

Setting Student Expectations

Before students even touch their fingers to the keyboard, you’ll want to lay down some ground rules. We recommend the following 10 Classroom Rules for Using Computers to ensure that there are no doubts about what respectful and responsible computer usage looks like.

There’s even a poster of the rules that you can print or order to have these rules at hand throughout the school year.

You may also want to check out the post on 11 Tips to Keep Your Classroom Concentrated at their Computers for easy ideas to make sure typing time is productive and on-task.

Then, to help save yourself a major headache when using Typing.com or any other online program, check out our tips on how to create and manage student passwords.

Helping Students Understand the Value of Typing

Nothing is more motivating to a student than understanding why they’re learning something. That’s when it stops being just an assignment, but something they can be excited about.

A lot of students (and even adults) don’t really understand why it’s worth learning to type with all ten fingers when they can get the job done with just two.

So to help students understand that this is an investment that will save them days, if not weeks of their lives in the future check out our article What is a Good Typing Speed?

For older students, they might find it interesting to know what kinds of jobs touch typing will prepare them for. They might be surprised to find out how many top jobs require good typing skills.

You can also motivate them with stories of some of the fastest typists in history. I bet you didn’t know that the very first world champion was a 17-year old girl!

Promoting Safe Computer Use

How often are you typing at the computer and find yourself hunched over in a position that can’t possibly be good for your posture?

We’re all guilty of it, and kids are no exception. So before they dive into the mechanics of typing, help students develop habits of safe computer use.

9 tips to keep you safe and comfortable at the keyboard outlines a number of easy tips and self-checks that students (ok, and adults) can use to ensure that their computer use is safe and comfortable.

Introducing Students to Touch Typing

When it comes to learning to type, we have four main goals for students to:

  • Become comfortable with computers
  • Type with all ten fingers
  • Type without looking at the keyboard
  • Type at the speed of thought

We explain the process of teaching and the right balance of typing activities to help students master these four things in our ultimate guides on How to Teach Typing.

For further help in explaining touch typing to your students check out the following articles:

Streamlining Your Movement on the Keyboard explains why the fastest way to type is by setting your fingers on Home Row and only moving the closest finger to type the key you need.

The Secret to Typing Without Looking at Your Fingers explains how muscle memory works, and how it can enable you to type much faster and without looking down at the keys.

Beyond that, you also might want to try An easy trick to get students to stop looking at their hands.

For more inspiration on how to kick off the year getting kids pumped about typing, check out the rest of the Typing.com blog. And don’t forget to leave us comments about how you’re using Typing.com in your classroom, or other blog topics you’d like to see covered!

AZERTY QWERTY keyboard

If you thought the QWERTY keyboard didn’t make sense… try the French keyboard

France is known across the world for its incredible designers—from Coco Chanel to Gustave Eiffel (who designed the Eiffel Tower). All of whom are renown for their unique and elegant designs.

One French design that’s not to love? The French keyboard.

The French have their own keyboard (also used in Belgium) that is known as the AZERTY keyboard. It is also known by many as the being the strangest and least logical keyboard in existence.

While there are minimal differences in letter placement from the QWERTY keyboard most of us are used to (A is swapped with Q and Z is swapped with W, for example), there are plenty of other peculiarities that make little sense at all, even to the French.

Below are just a few of the oddities.

French Keyboard Peculiarities

1. Typing a period

The French keyboard is the only one in the world that requires the user to press and hold shift in order to type a period. On the same button as the semicolon, the less common semicolon is given preference over the incredibly common period. What gives?

2. Typing numbers

Along with the period, numbers can only be accessed using the shift key! Just imagine the headache of trying to create an invoice or add data to a spreadsheet.

3. Impossible to find symbols

Many commonly used symbols such as the @ sign or French quotation marks don’t appear on the keyboard at all. They’re so tricky to find that most French people resort to copying and pasting them from another source.

4. Letter “ù”  key

While there’s no key for the @ sign and the period shares its key with the semicolon, the letter ù has a key all to itself. What’s so crazy about that? The letter ù is only used in ONE word in the entire French language où (where).

5. Letter “a” placement

The letter “a” is very common in the French language, and yet it’s been relegated to the hardest to reach spots, typically accessed with the left pinky.

Future of the French Keyboard

It’s one thing that foreigners struggle to use the French keyboard, but French natives are equally (if not more) outraged by its complete lack of logic.

So much so, in fact, that The Culture Ministry announced that they were working on a new version of the French keyboard in 2016. No news yet on when and if this will ever become a reality.

So even if the QWERTY keyboard may not be perfect, at least we know where to find the @ sign!

Should you use one or two spaces after a period?

It is a longstanding debate in the typing world – should you put one space or two after a period? Though this might be an inconsequential question to many, in the writing and editing professions this is a highly contentious topic. So just how did the controversy come about?

While putting one space after a period seems most natural, the alternative came to be with the proliferation of monospaced typewriter fonts. Monospaced fonts are ones in which each letter takes up the same amount of horizontal space. This means that the letter i and the letter w would take up the same space in a line of text, even though one is much narrower than the other.

typing rules

Monospaced fonts created a much looser looking line of text that some would even describe as messy. As a result, many typists decided that the extra space after a period was needed to make it easier to visually spot the end of the sentence. Some writers even got into the habit of using three or four spaces after a period for this purpose.

One space after period
two spaces after a period
Two spaces after period

Even though monospaced fonts stopped being used in the 1970s and were never common on computers, the practice of putting two spaces after a period stuck around. As typing teachers throughout the 80s and 90s continued to teach that two spaces after a period was proper form, the trend lasted on for decades.

While today most professionals agree that the extra space is unneeded and even inappropriate, it is still what many people are used to.

Whether you’re on team one space or team two spaces, when using Typing.com, you have the ability to choose which of the two options you would like to use based on your personal preference.

Who ever thought typing could be so controversial?

Leave us a note in the comments to let us know which one you use!

How to explain the SHIFT key to your students

If you have students who are fast on their way to mastering touch typing with exemplary speed and accuracy, how can you continue to provide them with a challenge? Suggest they practice advanced punctuation and symbols.

Symbols on the computer are tricky because most of them can only be accessed by pressing and holding the shift key while typing.

Because the keyboard can’t fit a key for every character, the shift (and option) keys allow us to type multiple symbols using the same key – an idea that can be confusing for students.

Teaching About the Shift Key

Help your students understand the concept of keys that can be used to type multiple symbols with an analogy. An easy one? Bunk beds.

Bunk beds allow you to have two beds in the space where normally only one would fit by stacking them on top of one another. If you look at your keyboard, you’ll notice that some keys have more than one number or symbol, one on top of the other, just like bunk beds.

When you are typing, and strike one of those keys, you need to let your computer know if you want to type the symbol you see on top “bunk” or the one on bottom “bunk”.

All keyboards are set to that multi-symbol keys will automatically type the symbol that’s shown on the bottom. In order to type the symbol seen on top, you need to first press and hold the shift key (there is a shift key on both the left and right side of your keyboard).

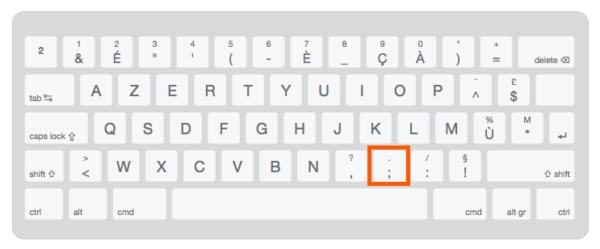
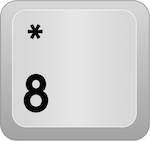
For example, pressing the number key “8” on your keyboard will produce the number 8. However, if you press and hold shift and then the key for “8”, you will get the top symbol *.
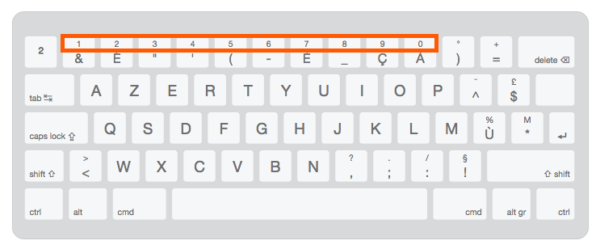
Additionally, there are also hidden characters on your keyboard that can be accessed using the option key or a combination of the option and shift key.

For example, clicking the letter “G” while holding the option key will give you “©”, the copyright symbol. And clicking the “?” key while holding option and shift simultaneously will produce “¿”, useful for writing questions in Spanish.

Most students won’t need to access too many special characters beyond those that are actually displayed on the keyboard, but even learning to use those basic ones can be a challenge for kids.

Practice using the shift key

Test yourself by trying out one of the punctuation lessons on Typing.com, question marks, say. You’ll likely find that even as an advanced typist it can be difficult to keep your speed and accuracy up while pressing two keys at once!

This is likely to be a struggle for students. So prepare plenty of practice time for them to get the hang of using the shift key.

Apart from punctuation lessons on Typing.com, there are other tools to help students practice this valuable typing skill. In our game, Type-a-Balloon, students can work on not only letters and words, but also numbers and punctuation marks.

Challenge your students to push their typing abilities to the next level with symbols (and be ready to show some patience along the way).

The Perfect Year-Long Typing Project

The ancient Roman Philosopher Seneca once said, “While we teach, we learn.” In recent years, scientists have been exploring the body of evidence to support this claim by studying what they call the protégé effect.

And sure enough, research supports the idea that students often learn best by teaching something to someone else. The mere fact of being accountable for someone else’s learning increases motivation to master a concept, and the need to explain it in one’s own words requires a deeper level of understanding.

Starting a class website is a great way to harness the power of the protégé effect as students become experts on a subject. Through doing research, conducting interviews, compiling findings, analyzing information, and presenting their ideas in a clear manner students are bound to come out with a much more profound understanding of a topic.

Additionally, a class website gives students something to show for their work down the line. It can be a growing and evolving project that students might even use on a college application one day.

Starting a class website

There are plenty of free platforms that teachers can use to start a website. Arguably the most user-friendly is Google Sites. With a few clicks on your keyboard, you can have a professional looking website in a matter of minutes!

Sign in to Google Sites with your Google account.

Click Create and choose between new or original Google sites (we prefer new for a much more polished look).

Create a title for the website so that you’ll be able to easily find it again, and then use the “Add editors” button at the top to add students to the website. You can share one website with your whole class, a small group of students, or assign a different website to each kid. Students will receive an email inviting them to edit the website.

At this point, the interface is easy enough to use that students can teach themselves (another valuable part of the learning experience). Just double click wherever you want to add text or an image, and a dial will pop up where to choose what you want to insert. On the right-hand toolbar, students can choose themes and add additional pages, and they can customize their sites by adding photo backgrounds and even embedding videos.

When students are ready to go public they just hit Publish at the top and choose a name and privacy settings for their website.

Click here for some more useful information on how to get students started with blogging.

Tips for managing a class website project

Whether you choose to use Google Sites or another platform, the following are some tips to ease the website creating process in your classroom.

  1. Have students do most of their research and planning in another document before starting the website. Students often get carried away with the aesthetic aspects of the website and can neglect the content. It’s best to have students type out their ideas in a word document and make revisions first. Creating the website should be the final step.
  2. Use comments to have students give one another feedback on their work. Once websites are public, have students read and comment on one another’s work so that they have an opportunity to learn from each other.
  3. Assign roles of class experts. As students are becoming experts on areas of study, they are also becoming experts on using the website interface. As kids learn new functions of the website building process, assign roles of class experts to students who are responsible for teaching other classmates how to upload a video clip or design a new layout.

Be prepared for your students to surprise you and themselves with just how much they can learn and do when tasked with the job of becoming an expert and sharing their knowledge through a class website.

For more resources on teaching your students about blogging, check out this online, interactive CTE course on Blogging for Beginners.

Hunt and Peck Vs. Touch Typing: Can Typing with Two Fingers Be as Fast As with 10?

There are plenty of people who can type quickly using just two fingers. Like with any skill, typing with just two fingers takes practice, and with more practice, speed and accuracy will improve.

So why bother learning to touch type with all ten fingers if you can do fine with just two? The bottom line is that even the fastest hunt and peck typists will never be able to type as quickly as someone who is making use of all ten of their digits. Below, we explore the most efficient method of typing for speed and accuracy.

(more…)

Teaching students about creating and managing passwords

On a recent visit to a local school that is using Typing.com in their classrooms, we discovered that the teachers were facing a major headache at the start of each class when the students had to log in.

At least 20 minutes of the class time was eaten up by students who couldn’t remember their passwords and couldn’t log in.

Now, I’m sure that these teachers aren’t the only ones facing this challenge, so here are some tips we’ve come up with to help young students understand, create, and manage their passwords.

Explaining the importance of passwords to students

Before setting kids off on a new computer program where they’ll need to choose a password, make sure to have a conversation about what the purpose of an internet password is and why it is important to make them unique and keep them a secret.

Even if the threat of someone accessing their Typing.com account doesn’t seem all that imminent or dangerous, we want students to take password creation seriously as early on as possible.

Thus, down the road when they are creating passwords for an online bank account or health insurance provider, they understand the importance of the task.

Helping your students create their passwords

With kids (ok, and most adults as well) it is important that passwords strike a balance between being memorable, but not so easy that they could easily be guessed.

With younger students, a good place to start is to have students generate passwords that use a combination of a personal word, phrase, or abbreviation with a number that they will remember.

To keep this simple you could ask them all to make a password with their favorite color and number. Eg. blue7

Optional: Use a password generator

There are also websites such as dinopass.com that will automatically generate strong passwords for kids. But, since these are not personalized, it is less likely that a student will remember it.

How to help students remember their passwords

When starting out, we recommend that students write down their password somewhere safe when they first create it so that they can reference it the first few times they log-on.

Soon enough, they will have committed it to memory and as long as they are using the website on a regular basis, they shouldn’t have any password problems.

What to do if your students forget their passwords

On Typing.com, even though teachers have the option to login and check or reset a student’s password, we recommend against doing this.

Instead of just giving them their passwords each time, we suggest having a “memory question” that you can ask students that will help them remember their password. This will help them to improve their memories and to teach them responsibility.

If you have them all create passwords with the same combinations (ie. favorite color and number), your job will be even easier.

Teaching your students early on the basics of creating and managing passwords, you will be doing them an invaluable service, which will help secure their online presence in the future.

We hope these tips will save you a significant amount of time and headache with each lesson!

If you have any additional suggestions, we’d love to hear them! Please leave a comment below!